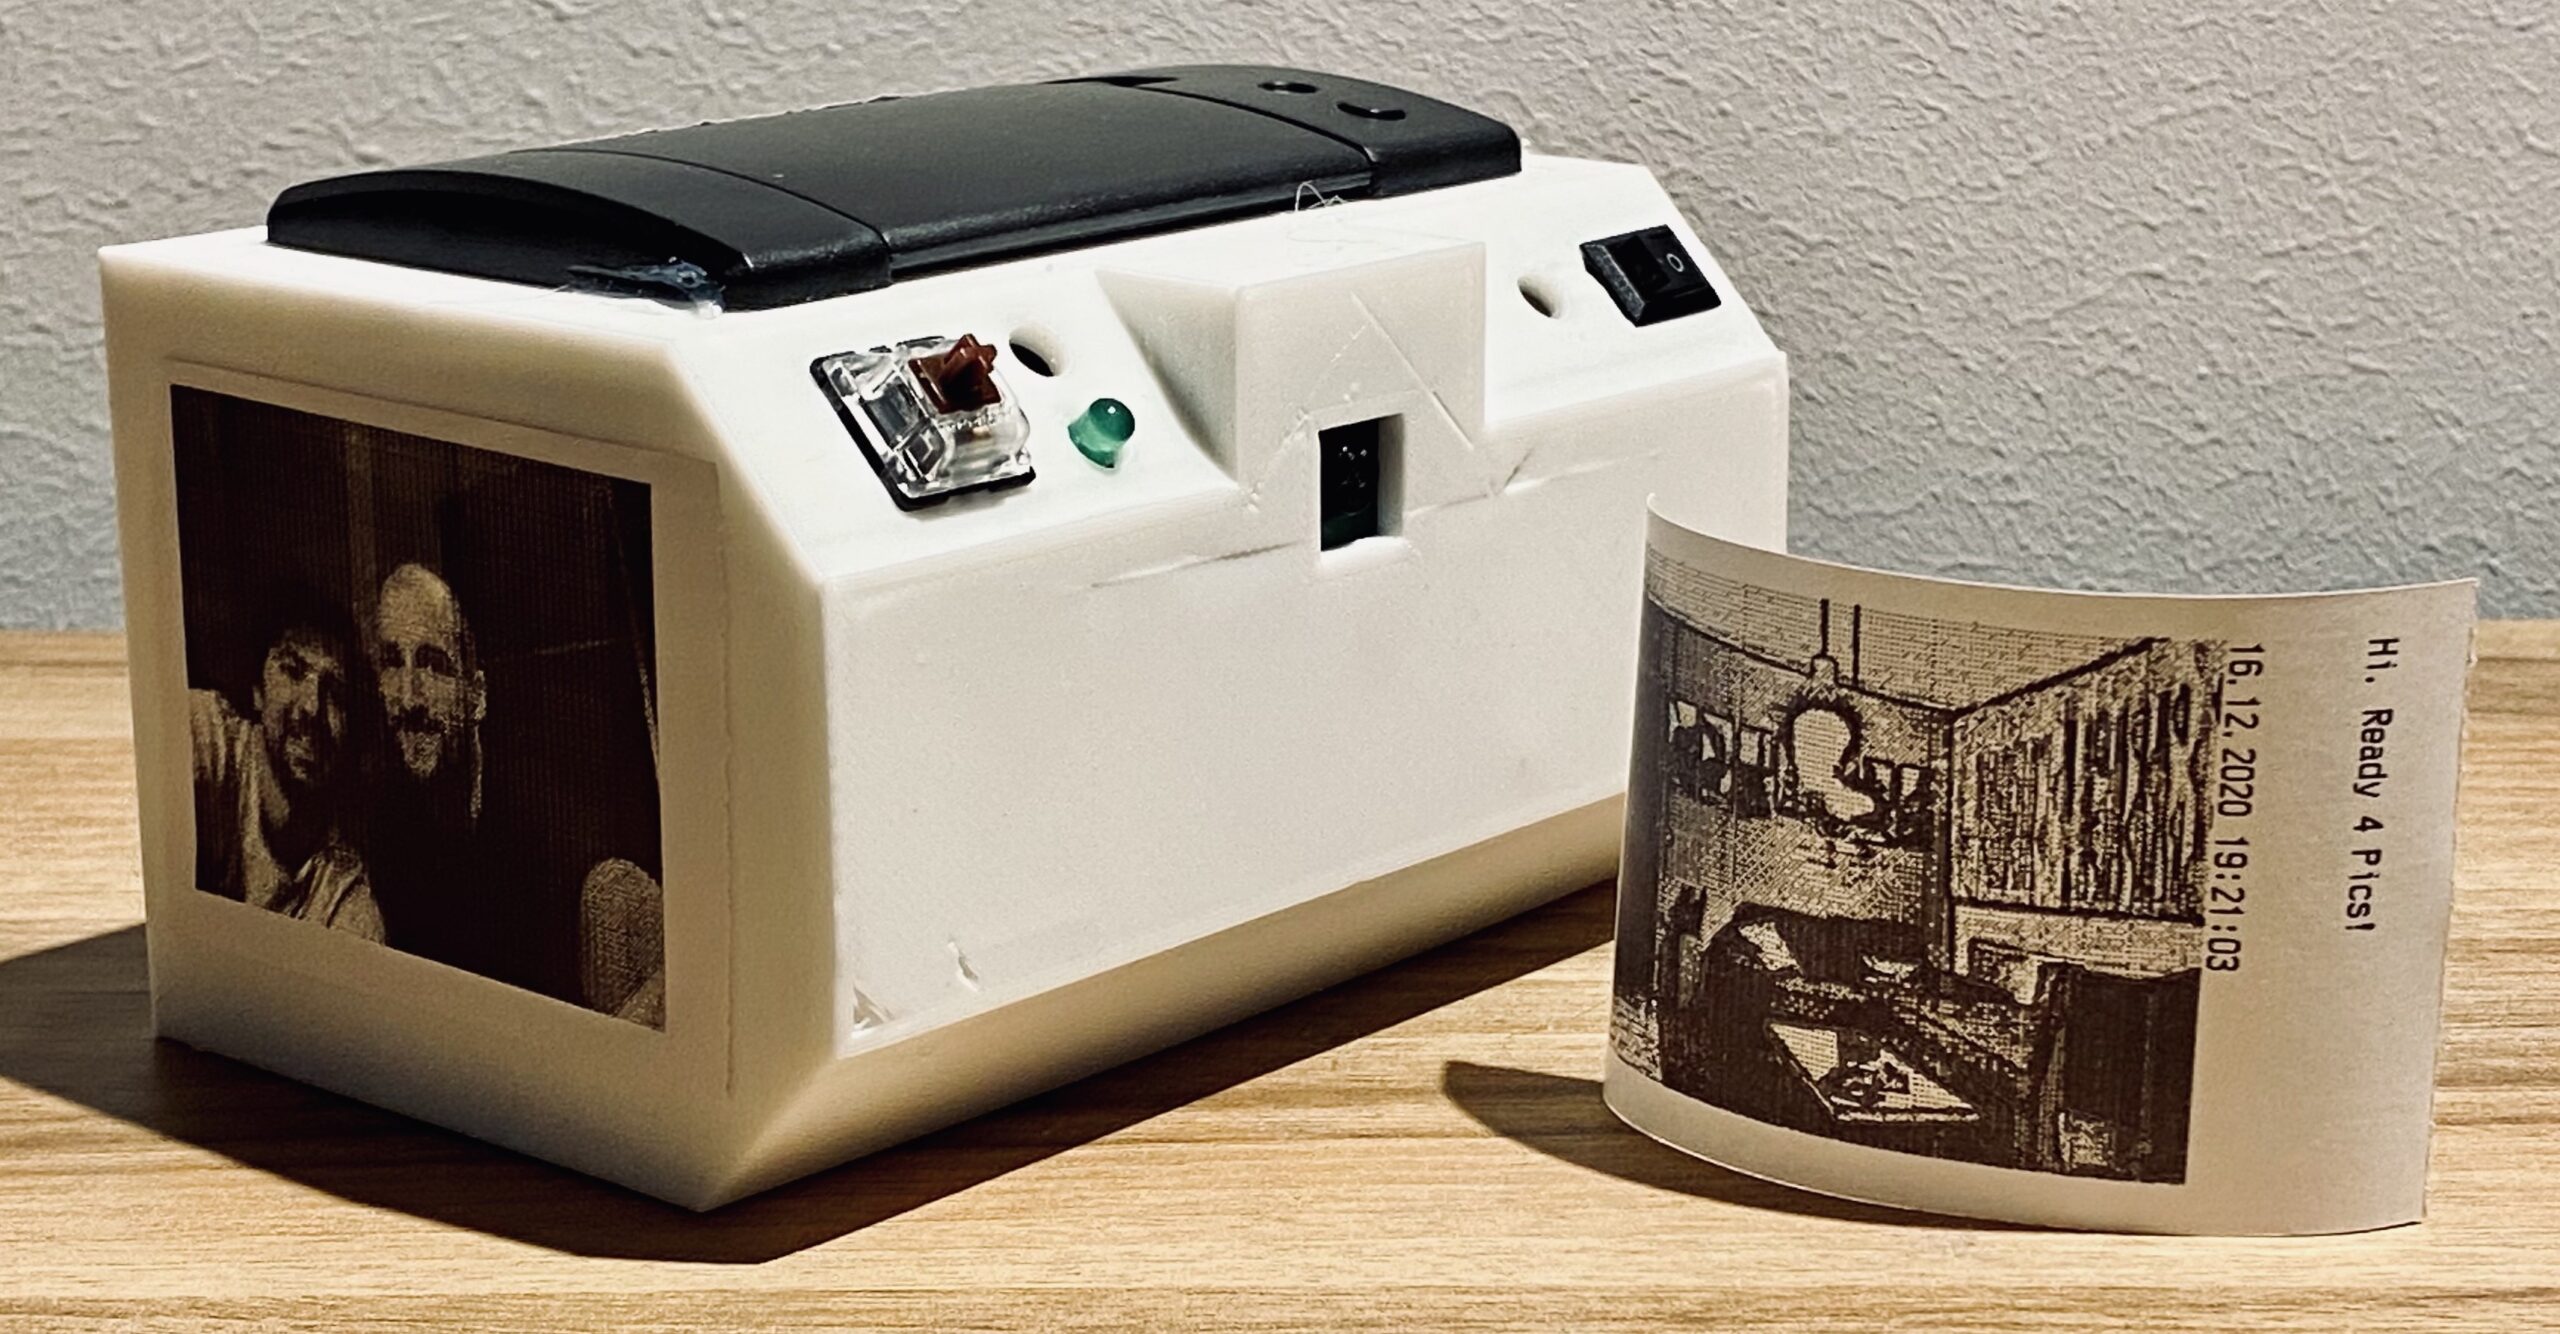
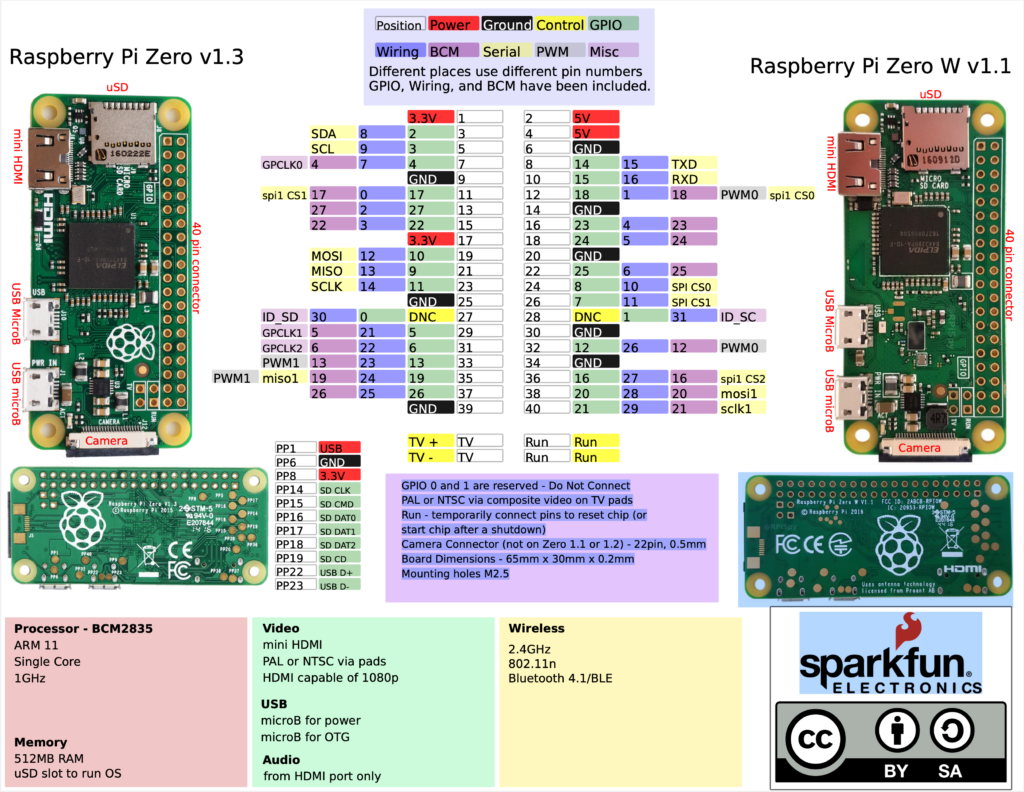
Raspberry Pi Instant Kamera mit Thermodrucker

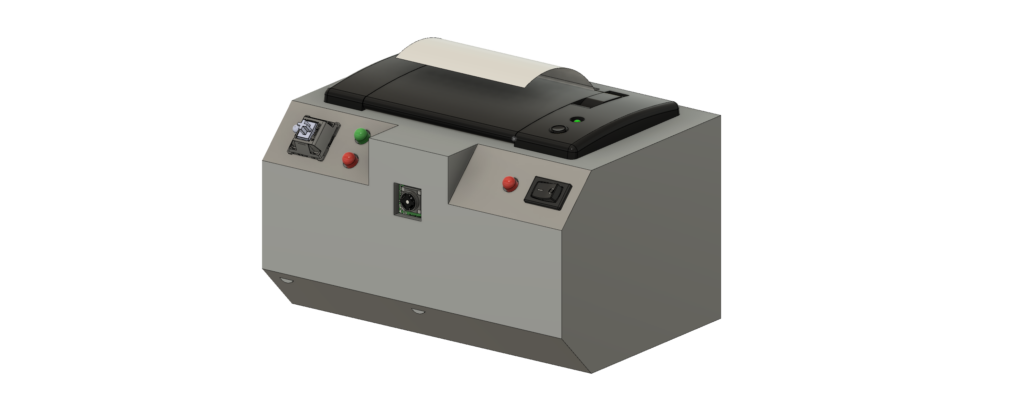
Hardware:
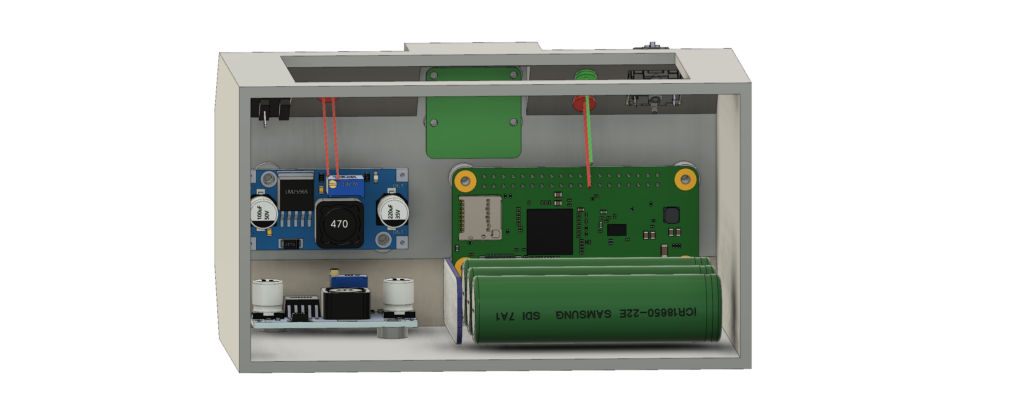
- Raspberry Pi Zero WH
- Raspberry Pi Camera Module (Rev. 1.3)
- Thermodrucker (Black, TTL):
- Step Down Converter (LM2596, HW-411): https://www.aliexpress.com/item/890503510.html?spm=2114.12010615.8148356.56.100e3120AHyLC5
Schaltplan
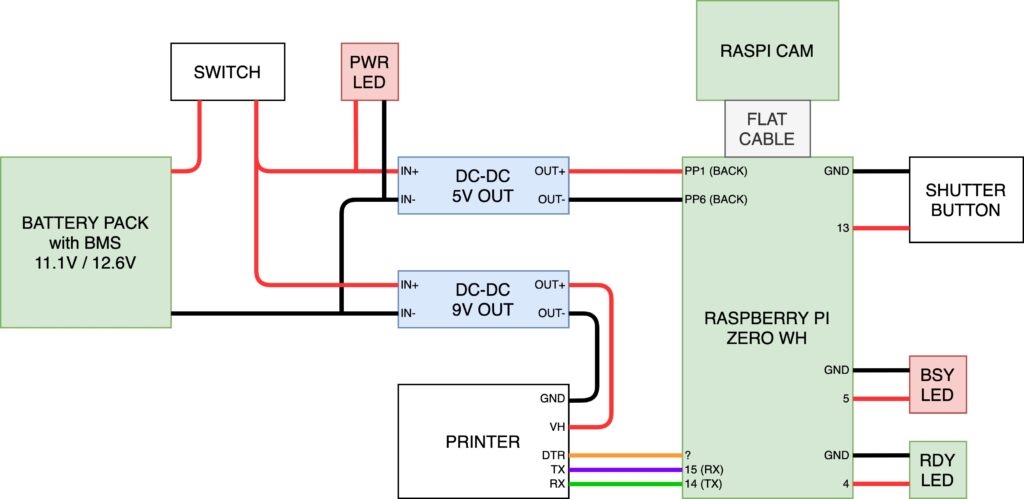
| Hardware | RPi Zero |
|---|---|
| Shutter Button | 5 |
| Utility Button | |
| Status LED | 13 |
| Printer TX wte | 15 (RX Pi) |
| Printer RX blu | 14 (TX Pi) |
| Printer DTS grn | |
| Effect Switch | 7 |
| Busy LED | 21 |
| Power LED |
Thermodrucker:
https://leap.tardate.com/playground/thermalprinter/qr701basics
https://www.aliexpress.com/item/4000724315117.html?spm=a2g0s.9042311.0.0.27424c4dTTFXPs
Hardware Specs
- small size, light weight, fully functional
- simple, easy connection
- high-speed, high-quality, stylish
- standard GB2312 large font
- Printing method: Thermal dot line printing
- RS232 / TTL interfaces, voltage 5-9V / 12V
| Feature | Sepcification |
|---|---|
| printing method | Thermal line |
| Print width | 48 mm |
| Dot density | 384 points / line |
| printing speed | 90 mm / s |
| Interface Type | RS232 / TTL |
| Paper roll diameter | ≦ 40mm |
| Paper thickness | 0.06-0.08mm |
| Paper roll | Width: 57.5 ± 0.5 mm |
| Character size | ANK character, Font A: 12 × 24 dots, Font B: 9 × 17 dots |
| Barcode Hard font | GB2312 font |
| Barcode type | UPC-A / UPC-E / JAN13 (EAN13) / JAN8 (EAN8) / CODE39 / ITF / CODABAR / CODE93 / CODE128 |
| Input buffer | 32k bytes |
| NV Flash | 64k bytes |
| Printer input voltage | DC 5V / 2A |
| Cash drawer control | DC 5V / 1A |
| weight | 0.183 kg |
| dimension | 109 × 94 × 66mm (depth × width × height) |
| working environment | Temperature: 0 ~ 45 °C, Humidity: 10 ~ 80% |
| Storage environment | Temperature: -10 ~ 60 °C, humidity: 10 ~ 90% |
| Print head life | 50 km |
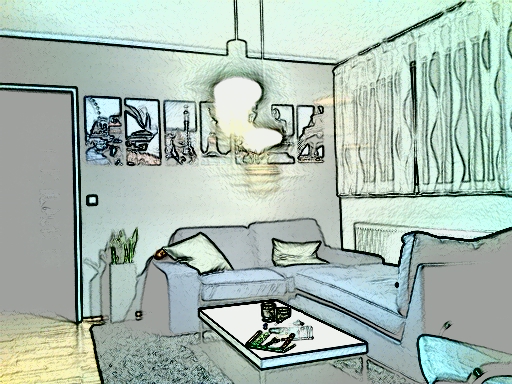
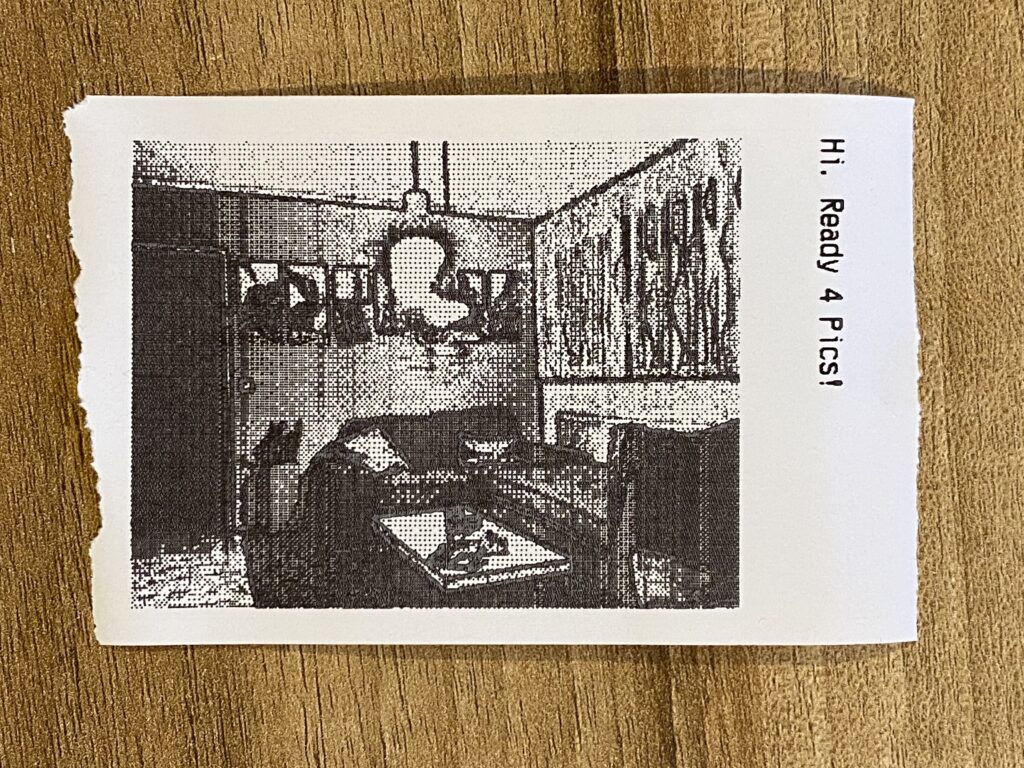
Testbild aus dem Drucker
Aperture Value: 3,07 Brightness Value: 0,14 Colour Space: sRGB Components Configuration: 1, 2, 3, 0 Date Time Digitised: 16.12.2020 at 19:21:04 Date Time Original: 16.12.2020 at 19:21:04 Exif Version: 2.2 Exposure Mode: Auto exposure Exposure Program: Aperture priority Exposure Time: 1/10 Flash: No Flash FlashPix Version: 1.0 FNumber: 2,898 Focal Length: 3,598 ISO Speed Ratings: 400 Max Aperture Value: 3,07 Metering Mode: CentreWeightedAverage Pixel X Dimension: 512 Pixel Y Dimension: 384 Shutter Speed Value: 1/10 White Balance: Auto white balance
Status LEDs
Alle Leds sollen gleich viel Strom bekommen:
Vorwiderstand Rechnung:
| LED | Spannung | Vorwiderstand | Strom |
|---|---|---|---|
| Rot (Power) (2,1V) | 5V | 330 R | 9mA |
| Rot (Busy) (2,1V) | 5V | 330 R | 9mA |
| Grün (Ready) (2,1V) | 5V | 330 R | 9mA |
Software
Shell Script in Autostart:
#!/bin/bash

SHUTTER=5
EFFECT=7
GREEN=13
RED=21

# Initialize GPIO states
gpio -g mode $SHUTTER up
gpio -g mode $EFFECT up
gpio -g mode $GREEN out
gpio -g mode $RED out

# Print welcome message on startup
stty -F /dev/ttyS0 9600
echo "Hi. Ready 4 Pics!" > /dev/ttyS0
echo " " > /dev/ttyS0
echo " " > /dev/ttyS0
gpio -g write $RED 0
gpio -g write $GREEN 0

# While Loop forever
while :
do
	# Check for shutter button
	if [ $(gpio -g read $SHUTTER) -eq 0 ]; then
	 	starttime=$(date +%s)
	 	# read how long shutter button was pressed
		while [ $(gpio -g read $SHUTTER) -eq 0 ]; do
			time=$(($(date +%s)-starttime))
			if [ $time -ge 3 ];
			then
				gpio -g write $RED 1
				gpio -g write $GREEN 1
			fi
		done

		# check how long button was pressed. mode select
		if [ $time -ge 3 ];
		then
			# longer than 3s
			# diagnostics
			HOST=$(hostname)
			IP=$(hostname -I | cut -d" " -f1)
			echo "$USER @ $HOST" > /dev/ttyS0
			echo "$IP" > /dev/ttyS0
			echo "$(df -h --output=size --output=avail --output=used --output=pcent /)" > /dev/ttyS0
			echo "$(du -h /home/pi/Pictures/)" > /dev/ttyS0
			echo "Pictures saved: $(ls /home/pi/Pictures/ | wc -l)" > /dev/ttyS0
			echo "Last: $(ls /home/pi/Pictures/ | tail -n 1)" > /dev/ttyS0
			echo " " > /dev/ttyS0
			echo " " > /dev/ttyS0
			gpio -g write $RED 0
			gpio -g write $GREEN 0
		else
			# shorter than 3s
			# picture mode
			gpio -g write $GREEN 1
			NAME=$(date '+%d.%m.%Y %H:%M:%S');
			FILE="/home/pi/Pictures/$NAME.jpg"
			if [ $(gpio -g read $EFFECT) -eq 1 ];
			then
				FX="none"
			else
				FX="sketch"
			fi
			# taking picture
			raspistill -n -br 60 -co 80 -sh 100 -ifx $FX -t 200 -w 512 -h 384 -o "$FILE"
			echo "saved $FILE"
			gpio -g write $GREEN 0
			# printing
			gpio -g write $RED 1
			if [ $FX == "none" ]
			then
				echo "$NAME" > /dev/ttyS0
			else
				echo "$NAME $FX" > /dev/ttyS0
			fi
      lp -o fit-to-page "$FILE"
      #sleep 10
      gpio -g write $RED 0
    fi
	fi
done
Random Stuff
- Auflösung VNC ändern:
sudo nano /boot/config.txtund Framebuffer Kommentar entfernen - Autostart hinzufügen oder entfernen:
sudo nano /etc/rc.local - Autostart killen:
pi@PiInstant:~ $ ps aux | grep camera
root       362  4.8  0.3   1924  1156 ?        S    19:35   0:45 sh /home/pi/zj-58/extras/camera.sh
pi       13221  0.0  0.5   7332  2176 pts/0    S+   19:50   0:00 grep --color=auto camera
pi       16859 17.5  9.8  85192 37112 ?        Sl   19:40   1:48 geany /home/pi/zj-58/extras/camera.sh
pi@PiInstant:~ $ sudo kill -TERM 362
pi@PiInstant:~ $ ps aux | grep camera
pi       16559  0.0  0.5   7332  2032 pts/0    S+   19:51   0:00 grep --color=auto camera
pi       16859 15.9  9.8  85192 37112 ?        Sl   19:40   1:48 geany /home/pi/zj-58/extras/camera.sh
Linksammlung
- Raspistill Doku https://www.raspberrypi.org/documentation/raspbian/applications/camera.md
- Erste Version Basierend auf Adafruit Projekt https://learn.adafruit.com/instant-camera-using-raspberry-pi-and-thermal-printer/system-setup
- Probleme Mit Druckertreiber: https://learn.adafruit.com/networked-thermal-printer-using-cups-and-raspberry-pi/connect-and-configure-printer
Nächste Schritte
PolaPi Zero: https://github.com/pierre-muth/polapi
Ältere Version: https://hackaday.io/project/7176-polapi
Neue Version (Anderer Drucker): https://hackaday.io/project/19731-polapi-zero
Ideen
Switch für Image Effekte: Sketch, Normal, …
Button für Diagnostics: WIFI status, Hostename, PW, USer
Display für Vorschau: 240×320*4D Systems uLCD-32PTU*
oder 4.3Zoll version 480×272 ULCD-43DT