
Dieses Projekt verwandelt einen Raspberry Pi in eine leistungsfähige Wetterdaten-Zentrale mit Echtzeit-Auswertung und Visualisierung. Mithilfe eines RTL-SDR-Sticks wird das Signal von drahtlosen Wetterstationen empfangen, mit rtl_433 dekodiert und über ein Python-Skript direkt in eine InfluxDB-Datenbank geschrieben. Die gesammelten Daten lassen sich anschließend mit Grafana Dashboards übersichtlich darstellen.
Zusätzlich wird der Systemzustand des Raspberry Pi durch Prometheus Node Exporter überwacht. Die Logs werden per Grafana Alloy an Loki weitergeleitet, was ein vollständiges Logging aller Services ermöglicht.
Technische Features:
- Empfangen und dekodieren von 433MHz-Wetterdaten via RTL-SDR und rtl_433
- Speicherung strukturierter Daten in InfluxDB
- Visuelle Darstellung mit Grafana
- Monitoring mit Prometheus Node Exporter
- Log-Streaming mit Alloy und Loki
- Vollständig automatisierter Start über systemd-Services
-> Follow up zu Nachbars Wetterstationen
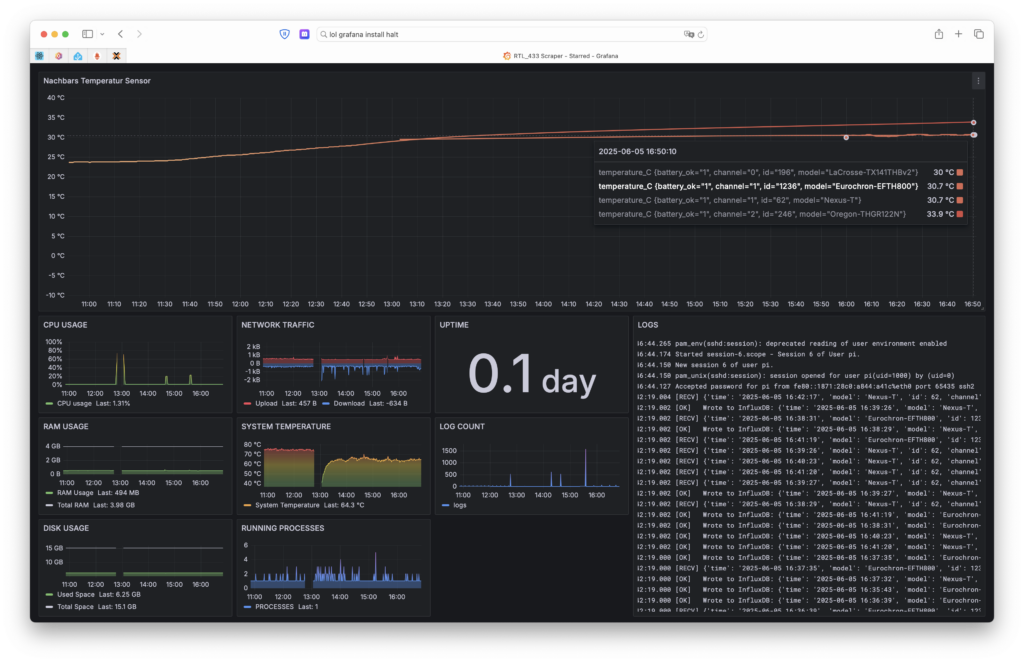
Hier die Live Daten!
Raspberry Pi vorbereiten
- Raspberry Pi OS (64 Bit) flashen ← Wichtig für spätere Schritte
- Debian Bookworm + Raspberry Pi Desktop
- Keine wpa_supplicant- oder ssh-Datei nötig
- Mit Bildschirm, Maus + Tastatur anschließen und einrichten
- Benutzername + Passwort
- WLAN-Verbindung herstellen
- Einstellungen → Raspberry Pi Konfiguration (GUI)
- Schnittstellen → SSH aktivieren
- Schnittstellen → VNC aktivieren
- IP-Adresse vom Pi auslesen
- Neustart
- VNC-Verbindung ohne Monitor aufbauen
- System aktualisieren
- (optional) WLAN + Bluetooth deaktivieren
RTL433 installieren
https://github.com/merbanan/rtl_433
sudo apt-get install rtl-433Neustart (sonst kommt evtl.: Please fix the device permissions, z. B. durch Installation der udev-Regeln rtl-sdr.rules)
Installation prüfen
rtl_433 -C si -F jsonErwartet: Wetterstationen im JSON-Format. Beispiel:
{'time': '2025-06-06 09:14:41', 'model': 'Oregon-THGR122N', 'id': 246, 'channel': 2, 'battery_ok': 1, 'temperature_C': 21.6, 'humidity': 56}Prometheus Node Exporter installieren
Node Exporter herunterladen (ARM64 für 64-Bit Raspberry Pi OS)
wget https://github.com/prometheus/node_exporter/releases/download/v1.9.1/node_exporter-1.9.1.linux-arm64.tar.gzArchiv entpacken und Binary nach bin verschieben
tar xvf node_exporter...
cd node_exporter...
sudo mv node_exporter /usr/bin/
sudo chmod +x /usr/bin/node_exporter
systemd-Service erstellen
sudo nano /etc/systemd/system/node_exporter.service
systemd-Service erstellen
/etc/systemd/system/node_exporter.service
[Unit]
Description=Node Exporter
Wants=network-online.target
After=network-online.target

[Service]
Type=simple
ExecStart=/usr/bin/node_exporter
Restart=on-failure

[Install]
WantedBy=multi-user.target
systemd neuladen und Dienst starten
sudo systemctl daemon-reload
sudo systemctl enable node_exporter
sudo systemctl restart node_exporter
rtl433_influx Python-Skript installieren
Github Repo klonen
git clone https://github.com/thazaubara/weatherstation-scrapercd weatherstation-scraperCredentials erstellen → nano credentials.py
influx_user = "user"
influx_password = "mystronkpassword"

influx_token = "your_api_key_from_influx"
influx_host = "http://influx_ip:8086"
influx_org = "cool_org.com"
influx_bucket = "bucketname"
Abhängigkeiten installieren
pip3 install influxdb-client --break-system-packageSkript testen:python3 rtl433_influx.py
python3 rtl433_influx.pysystemd-Dienst erstellen
sudo nano /etc/systemd/system/rtl_433_scraper.service/etc/systemd/system/rtl_433_scraper.service
[Unit]
Description=rtl_433 Python Scraper
After=network.target

[Service]
ExecStart=/usr/bin/python3 /home/pi/weatherstation-scraper/rtl433_influx.py
WorkingDirectory=/home/pi/weatherstation-scraper/
Restart=always
RestartSec=5
User=pi

[Install]
WantedBy=multi-user.target
Dienst aktivieren und starten:
sudo systemctl daemon-reload
sudo systemctl enable rtl_433_scraper.service
sudo systemctl start rtl_433_scraper.service
sudo systemctl status rtl_433_scraper.service
Log-Dateien lesen (optional)
journalctl -u rtl_433_scraper.service -fAlloy für Loki-Logs installieren
Alloy installieren:
sudo apt install gpg
mkdir -p /etc/apt/keyrings/
sudo wget -q -O - https://apt.grafana.com/gpg.key | sudo gpg --dearmor | sudo tee /etc/apt/keyrings/grafana.gpg > /dev/null
echo "deb [signed-by=/etc/apt/keyrings/grafana.gpg] https://apt.grafana.com stable main" | sudo tee /etc/apt/sources.list.d/grafana.list
sudo apt-get update
sudo apt-get install alloy
Alloy konfigurieren
Raspberry Pi hat kein Syslog und speichert keine Logs dauerhaft.
sudo nano /etc/systemd/journald.conf
...
[Journal]
Storage=persistent
...
sudo systemctl restart systemd-journald
Config-Datei erstellen: sudo nano /etc/alloy/config.alloy
loki.source.journal "journal" {
  forward_to = [loki.process.labels.receiver]
  labels = {component = "loki.source.journal"}
}

loki.process "labels" {
  forward_to = [loki.write.grafana_loki.receiver]

  stage.static_labels {
    values = {
      service_name = "weatherpi_journal",
    }
  }
}

loki.write "grafana_loki" {
  endpoint {
    url = "http://loki_ip_address:3100/loki/api/v1/push"
  }
}
Alloy aktivieren und starten:
systemctl enable alloy
systemctl restart alloy
systemctl status alloy
Software ist Fertig

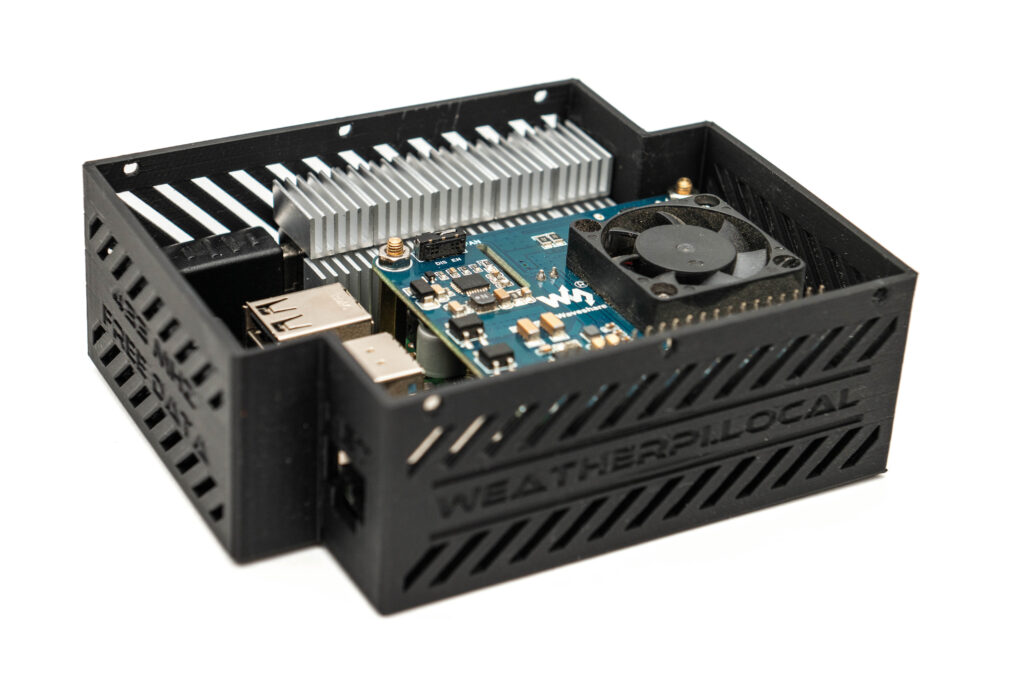
Noch ein Case drucken

Und jetzt noch paar nice real world Pics


